Currie Street
South Australia
View course →

Golf course guide, layout insights and strategy tips for Mount Osmond.
South Australia, Australia
Visit official club website →Course information and strategy based on Scoring Zone analysis.
Parkland
Course Type
Balanced
Difficulty
Most golfers lose shots at Mount Osmond through poor decisions, not poor swings. Get your hole-by-hole plan before you play.
Get your plan for Mount Osmond before you play⭐⭐⭐⭐⭐ Takes 2 minutes · No sign-up needed
Playable — This course is rated "Playable" because it is a mix of layout and conditions that require smart course management.
Mount Osmond is a par 70 course set in the Adelaide Hills, offering panoramic views of the city and coastline. The layout is defined by significant elevation changes and undulating terrain typical of a hilltop setting. Well-manicured fairways navigate natural slopes that demand precise control over ball flight and distance.
Explore more golf courses in South Australia.
Prioritise position over power to manage the steep gradients and side-hill lies. Players should calculate the effective distance for uphill and downhill shots, often adjusting by one or two clubs. Keeping the ball on the high side of the sloping fairways will help secure a flat stance for approach shots.
Nearby courses include Currie Street.
Prioritise position over power to manage the steep gradients and side-hill lies. Players should calculate the effective distance for uphill and downhill shots, often adjusting by one or two clubs. Keeping the ball on the high side of the sloping fairways will help secure a flat stance for approach shots. This is the defining strategy for Mount Osmond. Golfers who commit to this approach consistently score better here.
Scoring opportunities are found on the shorter par 4s where accuracy off the tee is rewarded with short irons into receptive greens. The greens are generally true but feature subtle breaks influenced by the overall hill topography. Maintaining a steady short game is essential to save par when the elevation changes result in missed greens.
Mount Osmond suits golfers who want to improve their scoring through better decision-making. Mid handicap players benefit most from playing conservatively, while lower handicap golfers can take advantage of scoring opportunities when they are clearly available.
The most common error is failing to account for the severe undulations, leading to shots finishing well short or long of the target. Over-attacking pins tucked on the high side of tiered greens can result in difficult recoveries from heavy rough. Ignoring the influence of elevation on club selection often leads to inflated scores.
On a typical 400-yard par 4 at Mount Osmond, the goal should be simple: two controlled shots. You don't need a perfect drive — you need a repeatable position that allows you to play your next shot with confidence.
Mount Osmond rewards discipline and clear decision-making. Always check the wind direction at the top of the hills, as it may differ from the calmer conditions found in the valleys. Practice side-hill and downhill lies before starting, as fixed stances are rare on this course. Focus on smooth transitions rather than aggressive swings to maintain balance on uneven ground.
Start my plan for Mount OsmondTakes 2 minutes · No sign-up needed
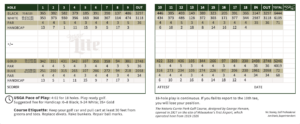
No problem — just scan the scorecard when you arrive. Scoring Zone reads the par and stroke index for every hole in seconds. Works on any course in the world.
Scoring Zone Golf App
Get a hole-by-hole plan for Mount Osmond built around your handicap. Takes 2 minutes before you play.
Start my plan for Mount Osmond⭐⭐⭐⭐⭐ Takes 2 minutes · No sign-up needed